Complete tasks via Email
Overview
You can easily configure any manual task to be completed by the allocated user via email. This functionality is known in Bizagi as Email integration.
When Email integration is enabled for a specific task, its allocated user will receive an email and then, the user can click any of the buttons included in the email and enter comments.
Buttons included in that email typically allow the user to decide on the path a case in Bizagi should take (commonly approving or rejecting a request).
How Email integration works with Bizagi?
To configure the Email integration feature, you need to first set up in your Bizagi project the connection to your corporate Email server, so that any type of email notifications can be sent by processes in Bizagi (via the SMTP protocol).
You will then need to set up how Bizagi will fetch the "Accept or reject" response at the corporate Email server (sent after the user clicks on either option presented in that email).
Bizagi will check if the response is sent using the assignee's email address before interpreting it.
Once Bizagi interprets the response given by the user, the task will be completed, relevant comments will be stored in the data model, and the process workflow will move on to the next task (accordingly, by following the path enabled by the particular decision).
The following image illustrates how Email integration works at runtime and the protocols it involves:
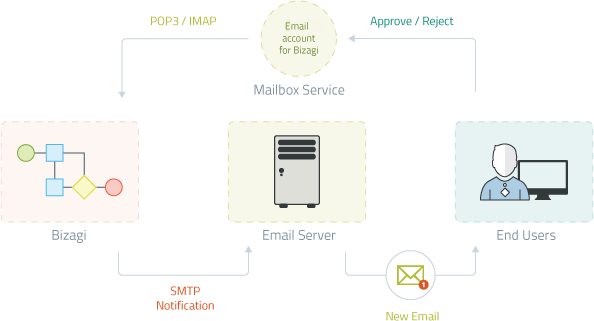
1. SMTP Notification
A process in Bizagi sends an email notification, to allow the completion of that task via email.
2. New Email
The allocated end user receives the new email (client applications installed in the end users' laptops will retrieve it from the Email server).
The end user will click an option presented in that email, that decides upon the next step that the process should take.
3. Approve / Reject
The response is sent to a specific mailbox service in which Bizagi uses a dedicated account.
4. POP3, IMAP
Bizagi listens to response arrivals (unread messages), so that it fetches them via standard protocols such as IMAP, POP3, or direct Exchange connections.
The response is processed by Bizagi to store comments and to enable the next step of the workflow.
When should I use this feature?
It is important that you adequately select tasks which are aligned to this feature's purpose.
This means that the concept behind this feature is not applicable to all tasks, and you will need to accurately define which tasks will use it.
Tasks of your processes which are applicable, or best candidates for the Email execution feature's use, are those which:
-
Are manual tasks (those requiring user intervention).
-
Present different choices that directly determine the path taken by the workflow (which task is enabled next).
In other words, tasks which are typically followed by gateway evaluating the choice that was made.
In Bizagi, this means that tasks should use the form buttons feature.For more information, refer to [Form buttons].
-
Require a small amount or user interaction (i.e no validations or sophisticated behavior in the user interfaces), and are mainly oriented to Approval or Rejection decisions.
This is so because the body of the email sent to the user, will namely contain strictly relevant information, and 2 or more options reflecting possible decisions (such as Approve or Reject or others, all this as previously defined in a template).The actual email WILL NOT present any controls that were designed for the user interfaces of that task. This would still be an email and not a user interface.
-
Do not require a large amount of input from the user (i.e, attachments are not allowed, nor entering information into tables).
The Email execution feature allows the user to enter general comments (or observations regarding the decision), which are stored by Bizagi in a predefined attribute of the data model. -
Are allocated to one user at a time.
If there is more than one user that can initially work in the task (up for the first one who works on it), no emails will be sent.
In other words, this feature's concept is not applicable when a task can be performed by anybody (i.e using the "Everyone" configuration for performers).
Prerequisites
Before moving on, and in order to make sure that you can explore, configure or verify this feature, you will need to previously set up the configuration in Bizagi to connect to your different email services.
Note that you may need assistance from your IT department for such configuration described next:
-
Before configuring the use of Email integration, make sure that your processes can send email notifications through your corporate Email server.
Such Email server needs to be compliant to the SMTP protocol, and its connection is to be configured in Bizagi as described at Email server configuration. -
Once you make sure that Bizagi processes send emails, proceed to configure the connection settings to the mailbox service from which Bizagi will fetch responses from users.
At this point you will need a dedicated email account solely for Bizagi's use.Important considerations for this dedicated account are:
-
It should be considered as a service account.
No user should use this account nor check emails of it, because only unread emails are fetched by Bizagi and then marked as read. -
It is strongly recommended to use one account per each Bizagi environment (one for development environment, one for testing, and one for the production environment).
Note
Though the mailbox service is usually provided by the same services of a corporate Email server, it is possible to use a different mailbox service, which is not part of your corporate Email server.The relevant aspect for such service is that it needs to support renown protocols such as POP3, IMAP or using an Exchange connection (widely used mailbox services such as those provided by Gmail, Exchange or Lotus are supported).
-
To configure the connection settings to the mailbox service, follow these steps:
- Open the Environment configuration and locate the Popular tab to configure the Email integration section.
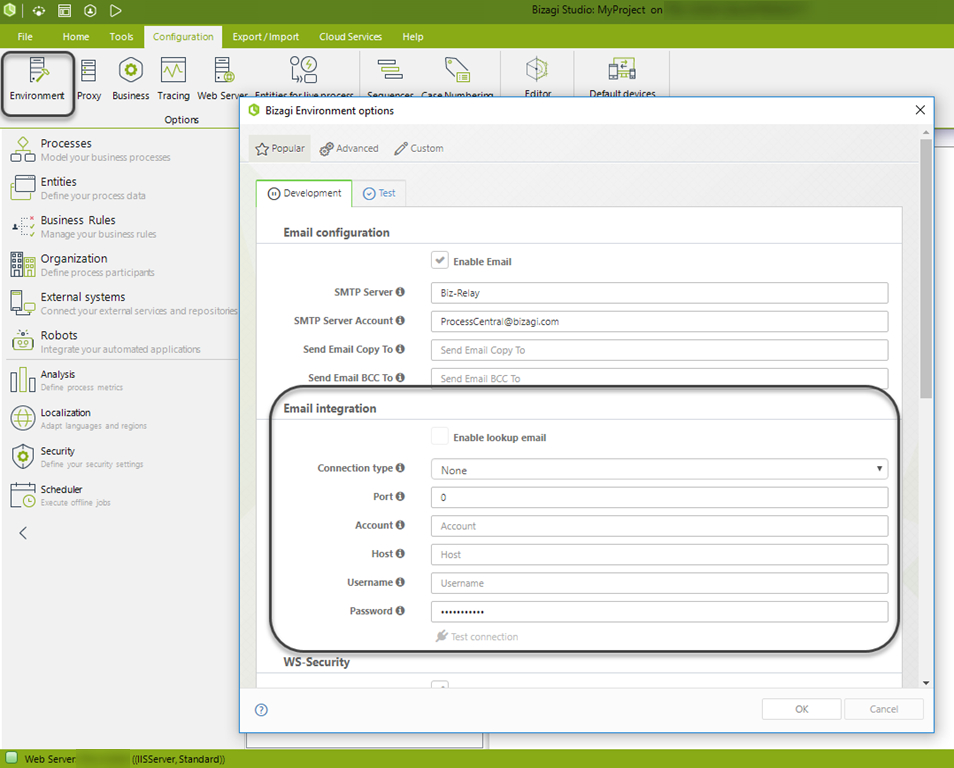
Consider configuring the parameters according to the table presented below, and considering your different environments:
| PARAMETER | DESCRIPTION |
|---|---|
| Enable lookup email | Tick this checkbox in order to allow Bizagi to use the Email integration feature for any of your tasks. |
| Enable SSL | Applicable to POP3 and IMAP protocols. Tick this checkbox to enforce that Bizagi uses the Email integration feature through a secure channel. |
| Connection type | Choose from the commonly used protocols for clients to fetch emails from a server (widely supported), such as POP3 or IMAP. Use Exchange if needed. |
| Port | Applicable to POP3 and IMAP protocols. The port number employed by the protocol. |
| Account | Specify the designated account for Bizagi's purpose. |
| Host / Mailbox service | Enter the name of the server that hosts the emails for the given account. |
| Username | Enter the authorized username that connects to your host/mailbox service. |
| Password | Enter the password for that authorized username. |
Note
- Recall that at this point you need to have already configured the connection to your SMTP server as shown above.
- Be aware that if the Connection parameters are changed on the Production environment, the active tasks cannot be completed via Email integration.
What you need to do in Bizagi
Once prerequisites are met, for any amount of tasks in which you wish to provide the Email integration feature, the following illustrates an outline of the steps you need to carry out:
-
Define or prepare the tasks that will use Email integration
Not all tasks are immediately available for this feature, as you will need to consider which ones are good candidates and have the required configuration. -
Enable that task to use Email integration
Allow the use of Email integration once such tasks have the required configuration. -
Define the email template and configure its use for the appointed task
Explicitly define the subject and body of the email notification, and any other relevant information. -
Configure additional parameters to handle the response
Such parameters consider where to store comments, treatment for failed responses, etc.
Example
To illustrate the required configuration, we will use a Vacation Request process as an example. In such process, typically the requester's boss or overseer, must make a decision regarding if the vacation leave request is approved, rejected or if additional information and changes are needed.
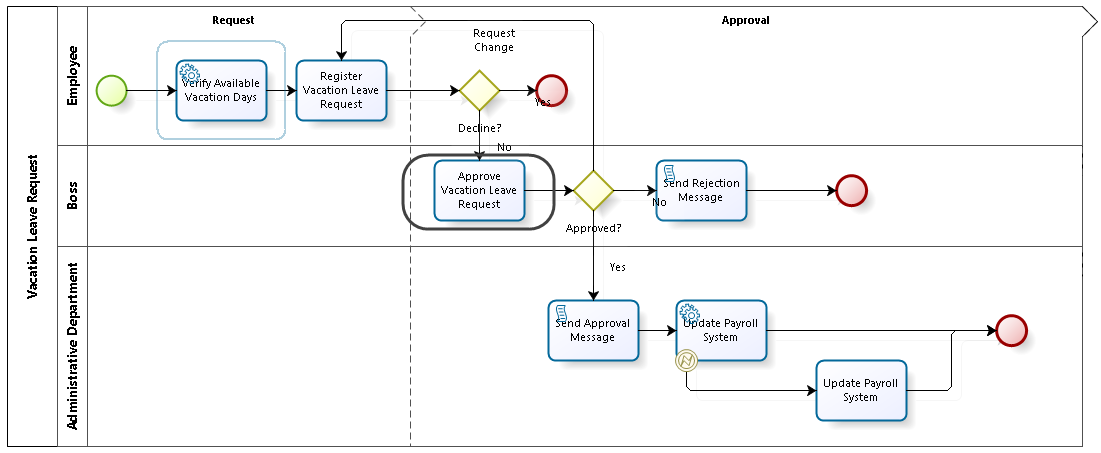
In this example, 3 different paths are enabled afterward, and the email sent to the requester's boss should present all 3 buttons: Approve, Reject, or Request changes.
1. Define or prepare the tasks that will use Email integration
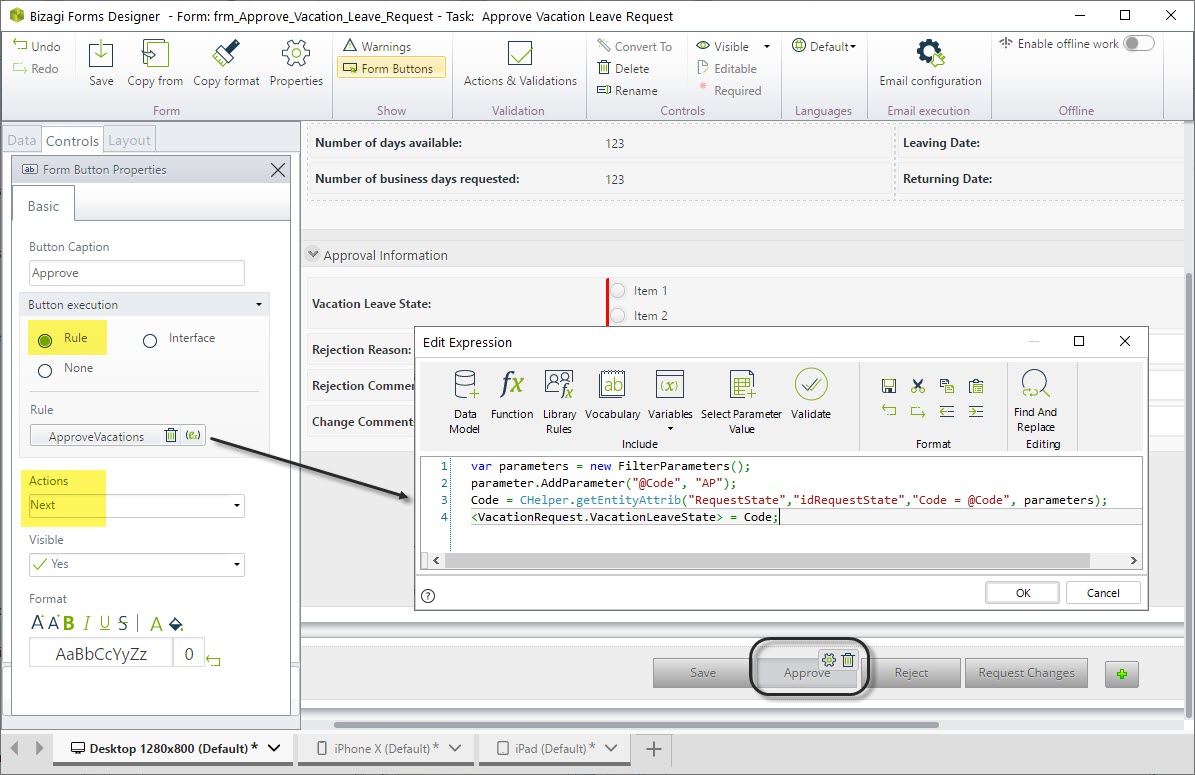
The Email configuration option will be enabled while having an active Form buttons configuration.

If your form does not already use form buttons, configure them by including one button for each of the possibilities, using a Next-action configuration for each button.
For instance, for the Approve button, we will use a Rule that sets the Approved state to "Approved" (code AP), and executes a Next action in Bizagi that completes the task.
Note:
The expression for this rule, for example as needed in the Vacation Leave request process available at the Process Xchange is:
var parameters = new FilterParameters();

parameter.AddParameter("@Code", "AP");

Code = CHelper.getEntityAttrib("RequestState","idRequestState","Code = @Code", parameters);

<VacationRequest.VacationLeaveState> = Code;
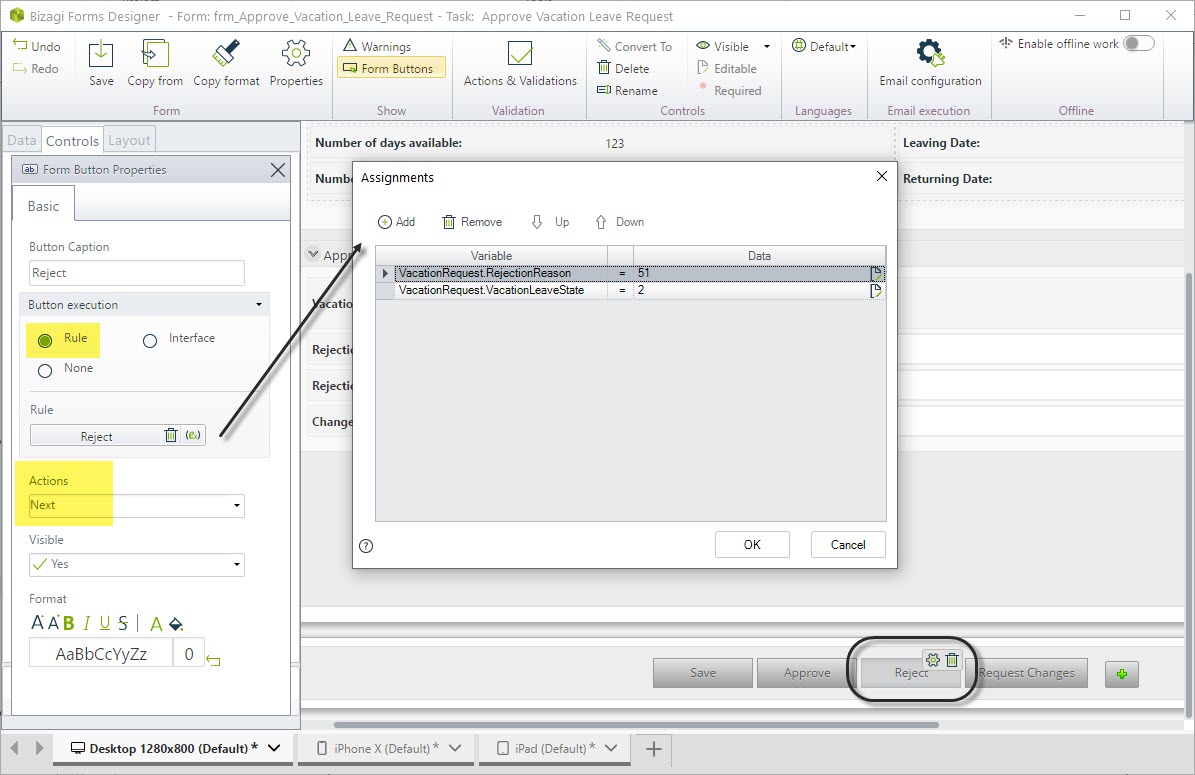
Similarly, the Reject button will use a Next-action as well though its rule would be slightly different to consider a Rejection reason:
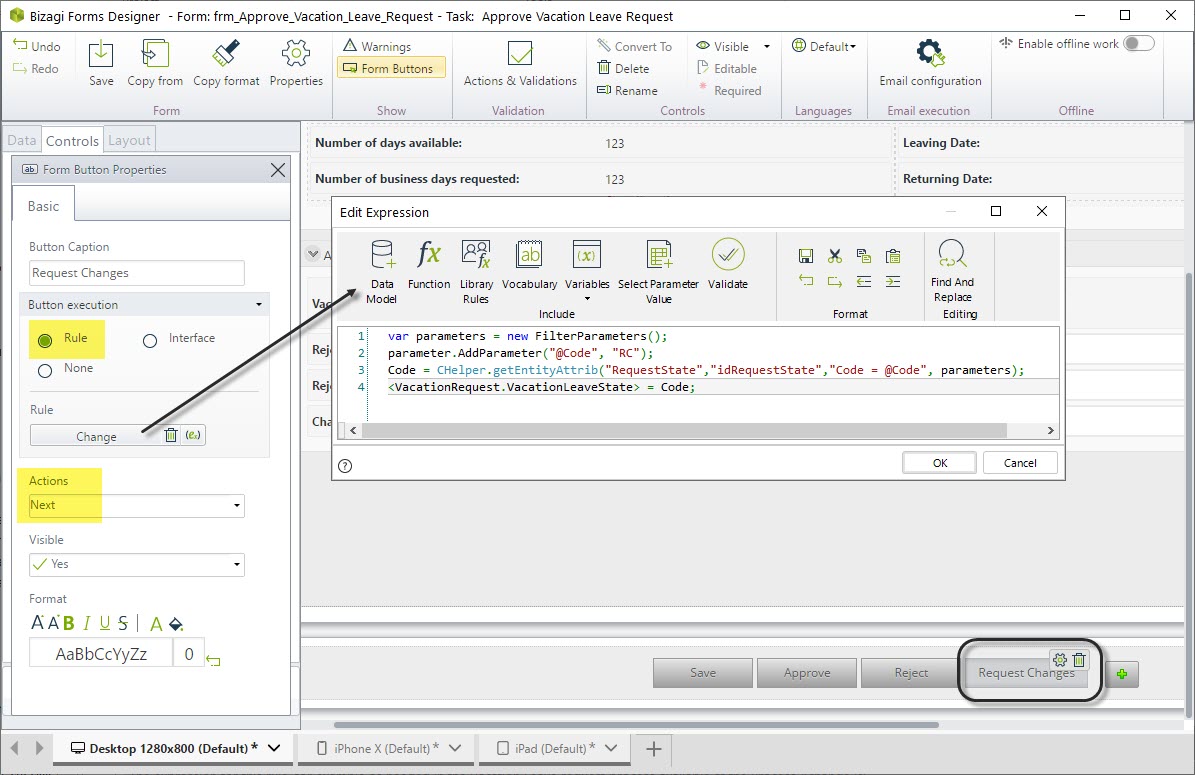
Finally, the Request Changes button is set in the same fashion as the Approve button:
Note:
The expression for this rule, for example as needed in the Vacation Leave request process available at the Process Xchange is:
var parameters = new FilterParameters();

parameter.AddParameter("@Code", "RC");

Code = CHelper.getEntityAttrib("RequestState","idRequestState","Code = @Code", parameters);

<VacationRequest.VacationLeaveState> = Code;
2. Enable that task to use Email integration
Activate the feature by enabling the Email execution setting.
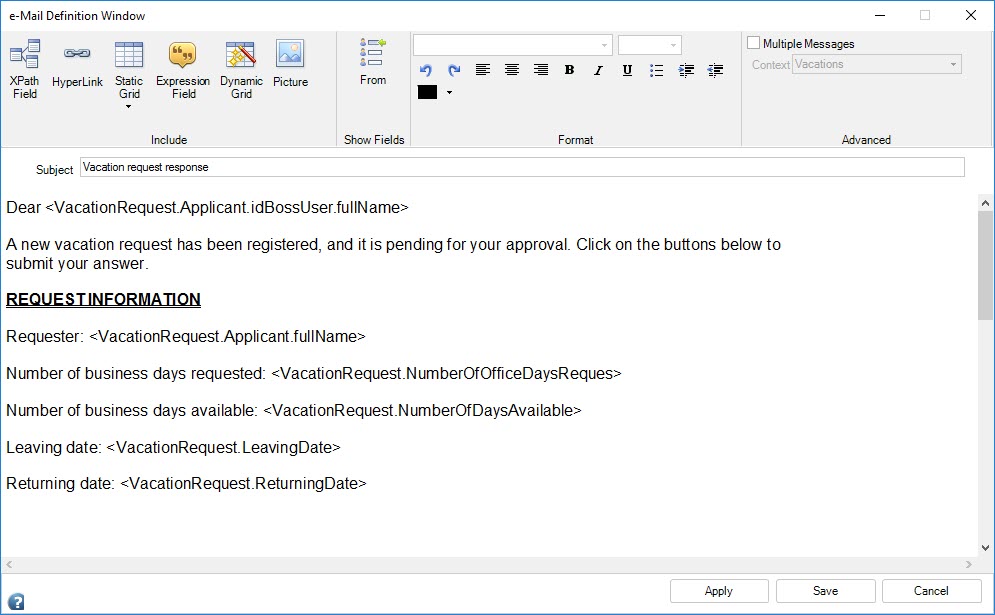
3. Define the email template and configure its use for the appointed task
Explicitly define the subject and body of the email notification.
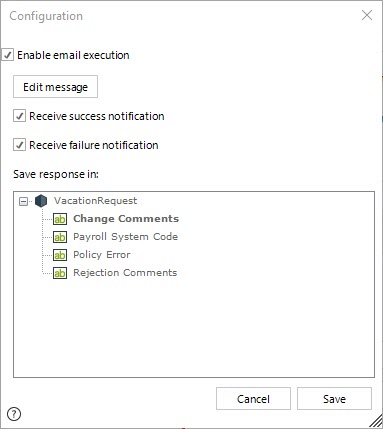
4. Configure additional parameters to handle the response
Tick the checkboxes to receive success or failure notifications and define where to store comments in the data model.
Execution
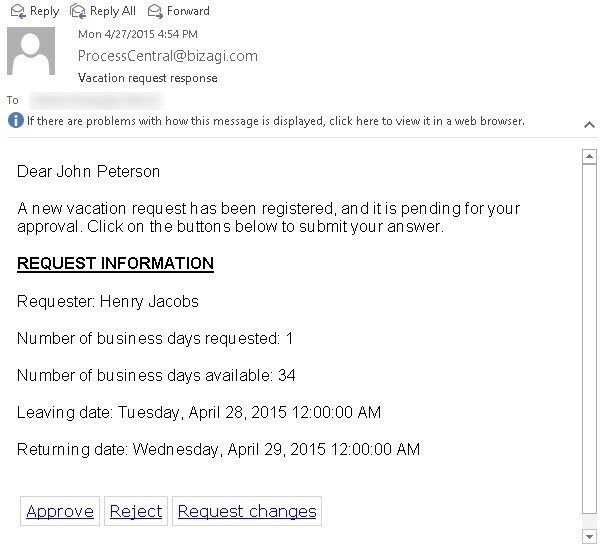
To illustrate how our example works in runtime, assume that a user called Henry Jacobs submits a Vacation request.
His boss, John Peterson, will then receive this email:
All John Peterson will do is click on any of the options available: Approve, Reject, or Request changes.
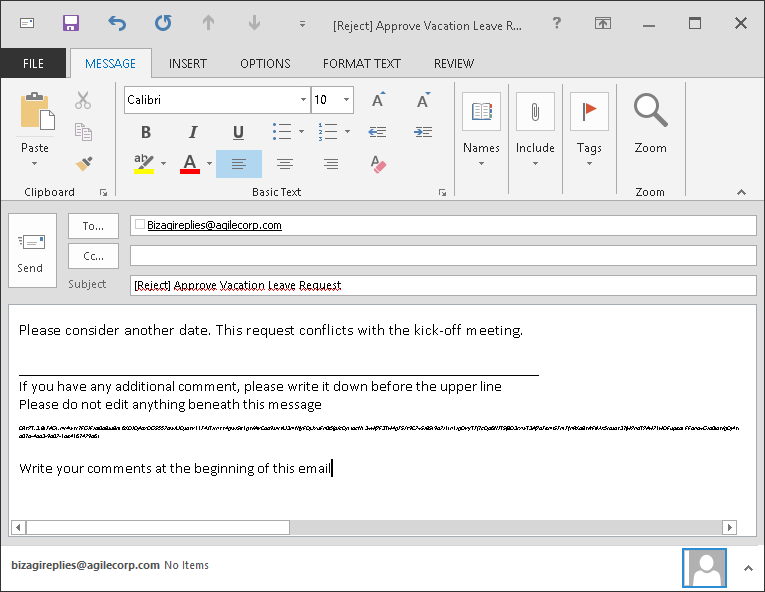
When doing so, a new email is sent back.
Note that the same email above corresponds to the appointed task that John Peterson may locate at the Work Portal as well:

The email sent back will use the appropriate subject to be handled by Bizagi (the choice inside brackets followed by the name of the activity), along with additional information that should not be modified (the recipient having the account as used by Bizagi).
The user may input additional comments at the beginning of the email:
Monitoring and troubleshooting
It is strongly recommended that an administrator monitors the Email integration and the adequate access from Bizagi to the mailbox service.
Logs recorded for Email configuration will be located in Windows Event Viewer.